888-963-9454
Mon-Sun: 9am-6pm CST
888-963-9454
Mon-Sun: 9am-6pm CST
If you want to make sure your tap water is clean and safe, you should think about putting in a whole house water filter. This helps get rid of stuff like dirt and germs that you don't want in your water.
Picking the right filter is key, and it depends on what's in your water. Some filters are best for well water, and others are made for city water.
Keep reading to find out how to choose and install the filter that's best for your house.

Installing a whole house water filter is a great way to ensure that all the water in your home is clean and safe to use. However, choosing the right filter for your needs can be a daunting task.
The first step in choosing the right whole house water filter is to assess your water source.
If you receive your water from a municipal source, you can usually obtain a water quality report from your local water authority. This report will tell you what contaminants are present in your water and at what levels.
If you have a private well, you will need to have your water tested to determine what 2. contaminants are present.
Once you know what contaminants are present in your water, you can determine what type of filter you need.
If your water has high levels of sediment, a sediment filter may be necessary. If you have high levels of chlorine or other chemicals, a carbon filter may be needed. If you have high levels of bacteria or other microorganisms, a UV filter may be necessary.
Look for filters that are certified by a reputable organization, such as NSF International. Pay attention to the filter's flow rate and capacity, as well as its maintenance requirements. Some filters require frequent cartridge changes, while others have a longer lifespan.

Before you start installing your whole house water filter, there are a few things you need to consider. Proper planning will help you avoid mistakes and ensure a smooth installation process. Here are some important factors to keep in mind:
Choosing the right location for your whole house water filter is crucial.
You want to select a spot that is easily accessible and close to your main water supply line. You should also consider the space required for the filter and its components. Make sure the area is well-ventilated and free from obstructions.
2. Gather Necessary Tools and Materials
You will need several tools and materials to install your whole house water filter.
Some of the essential tools include a pipe cutter, Teflon tape, shut-off valve, and bypass valve. You may also need additional plumbing fittings depending on your specific installation requirements.
It's important to gather all the necessary tools and materials before you begin the installation process.
Before you start installing your whole house water filter, you need to prepare the installation area.
This involves shutting off the main water supply to your house and draining the pipes. You should also clear the area of any debris or obstructions. If necessary, you may need to attach a piece of plywood to the wall to support the filter bracket.
Related read: Does a Water Filter Remove Fluoride? A Complete Guide
Installing a water filter system for the whole home can be a daunting task, but with the right tools and knowledge, it can be done easily. Here are the steps you need to follow to install a whole house water filter system:
Before starting the installation process, you need to turn off the main water supply to your house. This is important to prevent any water from flowing through the pipes while you are working on the system.
Once the main water supply is turned off, you need to install a shut-off valve on the main water supply pipe. This valve will allow you to turn off the water supply to the filter system when needed.
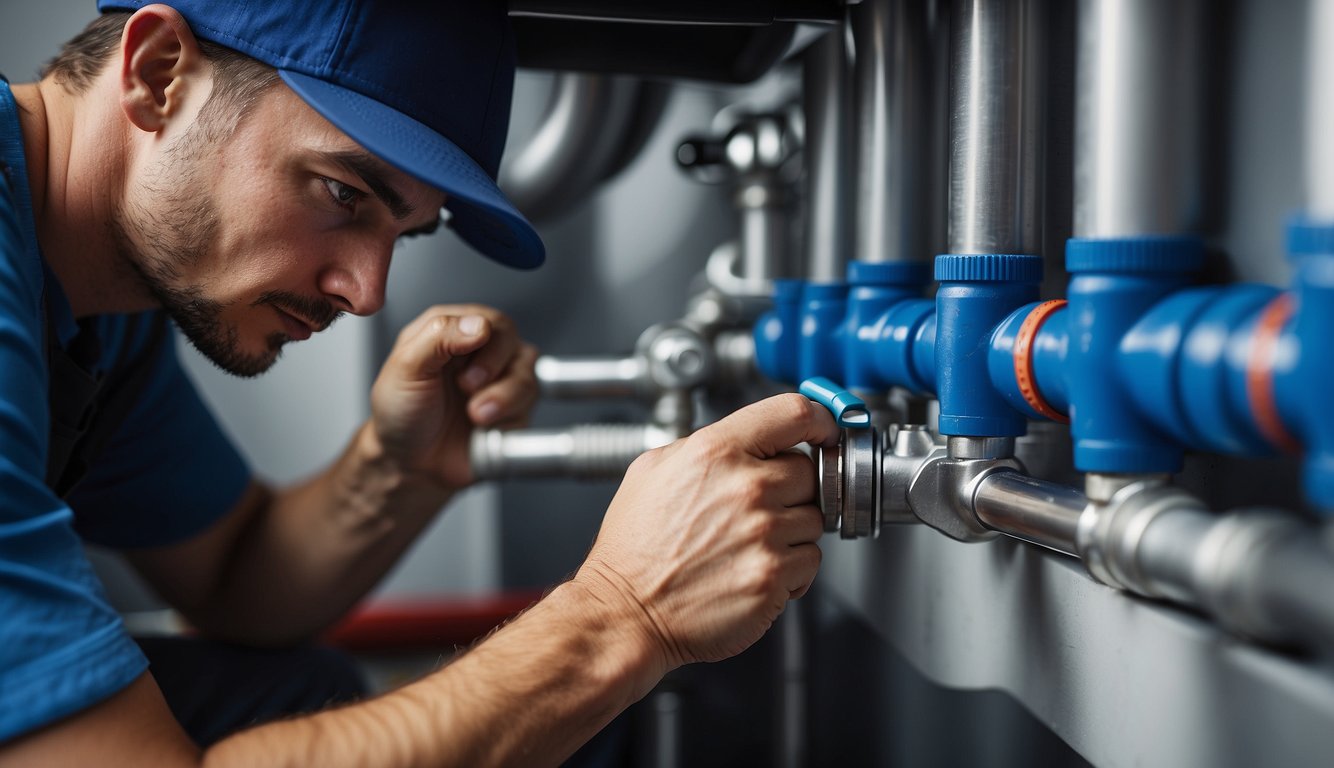
The filter housing is an important part of the filtration system. It is where the filter cartridge is placed and where the water is filtered.
You need to choose a location for the filter housing that is close to the main water supply pipe. Once you have chosen the location, you need to mount the filter bracket on the wall using screws. Then, attach the filter housing to the bracket.
After setting up the filter housing, you need to mount the filtration system. The filtration system is composed of the filter cartridge, the filter head, and the filter housing.
First, screw the filter head onto the filter housing. Then, insert the filter cartridge into the filter housing. Make sure that the filter cartridge is properly seated and that the O-ring is in place.
Once the filtration system is mounted, you need to connect it to the water supply pipe.
Cut out a section of the water supply pipe using a tubing cutter. Make sure that the section you cut out is long enough to accommodate the filtration system. Then, attach the filter head to the water supply pipe using the fittings provided in the kit.
After connecting the filtration system to the water supply pipe, you need to check for leaks.
Turn on the main water supply and check for any leaks in the system. If there are no leaks, turn on the filter system and check for leaks again. Once you have confirmed that there are no leaks, you can start using your whole house water filter system.

Once you have successfully installed a whole house water filter, it's important to follow some post-installation guidelines to ensure that your new filter is working effectively and efficiently.
After installing the new filter, it's important to flush it thoroughly before using any water in your home.
Flushing helps to remove any loose carbon fines or debris that may have accumulated during the installation process. To flush the new filter, follow these steps:
After installing a whole house water filter, you may notice a slight decrease in water pressure. This is normal and is usually due to the additional resistance created by the filter.
To adjust the water pressure, follow these steps:
You should also monitor the filtered water quality regularly. Keep an eye out for any changes in the taste, odor, or clarity of the water. If you notice any issues, it may be time to replace the filter or perform maintenance on the system.
Also read our guide: How to Change Whole House Water Filter: A Step-by-Step Guide
Maintaining your whole-house water filtration system is crucial for ensuring that it continues to provide clean, safe drinking water to your home. Here are some essential tips for keeping your system in top condition:
The filter cartridges in your whole-house water filtration system will need to be replaced periodically.
The frequency of replacement will depend on the type of filters you are using and the quality of your water supply. Sediment filters typically need to be replaced more frequently than carbon filters.
To determine when it's time to replace your filters, consult the manufacturer's instructions or check the pressure gauge on your system. If the pressure gauge reads higher than normal, it may be time to replace your filters.
Regular cleaning and sanitizing of your whole-house water filtration system is important for keeping it free of bacteria and other contaminants. Here's how to clean and sanitize your system:
If you experience any issues with your whole-house water filtration system, here are some common problems and their solutions:

If you have a private well, you may need to take additional steps to ensure that your whole house water filter system is effective. Here are some special considerations to keep in mind:
Well water often contains high levels of sediment, which can clog your whole house water filter system and reduce its effectiveness. To prevent this, consider incorporating a sediment filter before your main filter. This will help remove larger particles before they reach your main filter, extending its lifespan and improving its performance.
In addition to sediment, well water can also contain harmful bacteria and viruses. To ensure that your water is safe to drink, consider adding a UV purification step to your whole house water filter system. UV purification uses ultraviolet light to kill bacteria and viruses, providing an additional layer of protection for your family.
Well water is often harder than municipal water, which can cause scaling and buildup in your pipes and appliances. To prevent this, consider adding a water softener to your whole house water filter system. Water softeners use ion exchange to remove minerals that cause hardness, preventing scaling and buildup and extending the lifespan of your pipes and appliances.
When installing a whole house water filter, you have two options: DIY or professional installation. Each approach has its own advantages and disadvantages, so it's important to evaluate which one is right for you
If you're a handy person who enjoys tackling DIY projects around the house, installing a whole house water filter can be a rewarding experience. Not only can you save money on installation costs, but you can also customize the installation to fit your specific needs.
However, before you dive into a DIY installation, there are a few things to consider. First, make sure you have the necessary tools and skills to complete the installation. Installing a whole house water filter requires some plumbing skills and knowledge of local building codes. You'll need to be comfortable with tools like a tubing cutter, wrenches, and a drill
Second, be sure to carefully read and follow the manufacturer's instructions. Each filter system is different, and the installation process can vary depending on the make and model. Failure to follow the instructions could result in a faulty installation or even damage to your plumbing system.
If you don't feel comfortable with the technical aspects of installing a whole house water filter, or if you simply don't have the time or inclination to tackle a DIY project, hiring a professional installer may be the best option.
A professional installer can ensure that the installation is done correctly and up to code, which can give you peace of mind. They can also help you choose the right filter system for your needs and provide guidance on maintenance and upkeep.
Keep in mind that professional installation can be more expensive than a DIY approach. However, the cost may be worth it if you want to ensure a hassle-free installation and long-term performance of your filter system.
Installing a whole house water filter is a smart step to ensure clean, safe, and tasty water at home. Pick the best filter, install it with our easy guide, and do regular maintenance for long-lasting benefits.
If you're unsure or need assistance, professional help is always a good idea. Ready for fresher water in your home? Check out the top-quality water filters at Carbon Wellness MD and find the perfect fit for your needs. Start enjoying cleaner water today!
Yes, a whole house water filter can be installed on the main line. In fact, installing a filter on the main line ensures that all the water entering your home is filtered, including the water used for drinking, cooking, and bathing.
The cost of installing a whole house water filtration system varies depending on the type of filter, the size of the system, and the complexity of the installation. On average, the cost ranges from $1,000 to $5,000.
Yes, it is possible to install a whole house water filter system outside. However, it is essential to choose a location that is protected from the elements and easily accessible for maintenance.
To replace a water filter cartridge in a whole house system, turn off the water supply, remove the filter housing, and replace the old cartridge with a new one. Make sure to follow the manufacturer's instructions for replacing the cartridge.
Yes, there are several benefits to having a whole house water filter. It removes impurities and contaminants from your water supply. This provides you with clean, safe, and healthy water for all your household needs. It also prolongs the life of your appliances and plumbing fixtures. This reduces maintenance costs and increases their longevity.